How to Create an Embroidery Hoop Gallery
9:46 PMWhy I Love Embroidery Hoop Displays!
 |
| My Nursery Embroidery Hoop Gallery Wall |
Making Embroidery Hoop Galleries
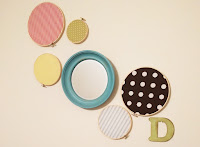
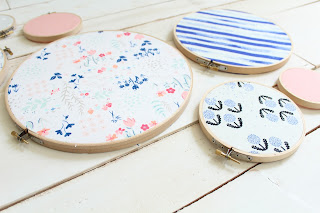
 I made this new gallery from some fabrics I fell in love with online. I just have to give a quick shoutout to picking out fabrics online! It's fantastic! I usually HATE picking out fabrics. Seriously.... HATE! There is so much on display at fabric stores, it is so overwhelming. And it takes forever to find great fabric combinations that compliment each other. Not to mention my children begging to get out of there. And hauling around HUGE bolts of fabric. It really is a nightmare. But online you can add fabrics to a design wall, see them next to each other, move the swatch around, delete what you don't like and see what goes well together. I love it and I love how these fabrics came together for this project. I started with the pink and blue floral fabric and then worked from there to find complimenting fabrics. I did my fabric shopping on Fabric.com, it was a reasonable price, fast shipping and a much better experience than a fabric store. So here's how to get it done. It's very simple and I don't want to over complicate it. Let me know if you have any questions and I would love to help.
Also, if you want to avoid the high costs of buying embroidery hoops and fabric, you could probably save money by buying this set of 7 on my Etsy shop! CLICK HERE for the listing. I was able to cut costs by buying hoops in sets of 6! They can get pricey.
SUPPLIES
1. Embroidery Hoops of different sizes
These can get pricey and I shopped around for the best deal. I bought mine online (some in bulk) from Amazon. Here's the sizes I chose and how many I used in that size. You can click the sizes to go to the amazon link.
- 1-10" hoop- floral fabric
- 2- 3" hoops-grey cross and peach
- 1- 4" hoop with peach fabric
- 1-5" dandilion fabric
- 2- 8" hoops, bow tie pattern and bold blue stipes
2. Various coordinating fabrics
Cotton fabrics are best because they don't stretch and deform the print as easily, but the floral fabric on this project was jersey and it still worked, it just takes a little extra care when tightening. I loved the floral fabric too much to not use it. I chose six different fabrics for this project, the peach colored fabric was repreated in two different sized hoops. I found my fabrics on Fabric.com.3. Glue- I used plain Elmer's
4. Scissors
5. Nails and hammer to hang
INSTRUCTIONS
It helps to layout your hoops in the beginning to make sure you have the fabrics you would like in the hoops you like before you start glueing.
1. Separate embroidery hoops
2. Put glue on the inside of the larger outside hoop, rub the glue out a little so it covers more space.
3. Loosely lay fabric face down on top of the glued hoop
4. Put inside hoop over the back of the fabric and press down into the outside frame
5. Tighten the embroidery hoop screw
6. Pull the fabric tight so there are no wrinkles
7. Wipe off the excess glue that came through the edges of the hoops, if you feel like there wasn't enough glue to make the fabric stick, add a little extra glue on the top
OR
8. Let the hoops dry
9. Trim off the excess fabric
10. Nail and hang


0 comments