How to DIY Refinish Laminate Furniture
3:43 PM
I have refinished A LOT of furniture in our house. Dressers, kitchen chairs, tables, arm chairs, etc.
 |
| Our Entertainment Center- I Need to find a before picture...it was BAD! |
My addiction to refinishing furniture started with this dresser I found on Craigslist for $25. SUCH A DEAL! There was just one problem... the top was covered in laminate. :( Which meant no matter how much I sanded, the top would not absorb the primer as well as the rest of the piece. I originally worried that this would mean the paint wouldn't hold up as well, but it has! Over 2 years now and being in our main room, there is no peeling and no scratching!
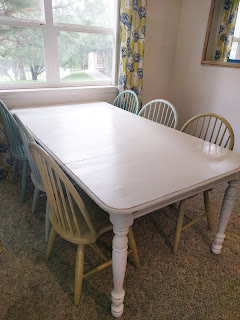
Just recently, I refinished this kitchen table I found sitting on a lawn with a free sign. I couldn't believe my eyes. I had been looking for a sturdy kitchen table for a very long time, almost five years and this one was perfect. It just needed my TLC!
 |
| The BEFORE...not bad... but not great! |
SUPPLIES:
Sandpaper/ Sander
Primer
Paint- Latex Satin Finish
Polyurethane
Sponge Roller
Paint Brush
DIRECTIONS:
1. Sand.
Sand EVERYTHING you can easily get to. I didn't worry too much every crevice on the turned spindle legs! I have learned that with good primer, it really doesn't make too much of a difference for the effort it takes to get to every little part. Most important is to sand the laminate top! It will not take it off or change the color but it will roughen up the plastic to create texture for the primer to cling to. Which in return will get your paint to stay better.
2. Prime.
Cover everything in primer. Remember, this is just primer. It is going to absorb in certain places more than others and it will not be a perfect finish. That's what the paint is for. The sponge roller will really help the primer and painting process be quick and fast.
3. Sand Again (optional)
Since this is a kitchen table, and it is going to get a lot of use, we wanted a smooth finish on the top. So we sanded the dried primer with a very fine paper on the top just to get a smoother finish. We did not take it off.
3. Paint.
People always ask me if I use a chalk paint to refinish my furniture pieces. I do not. I have seen friends use chalk paint on their projects because it doesn't require priming (so they say). Unfortunately, their projects quickly chip. I just use a regular satin finish latex pain. For this project, I used 4 bottle of these sample sizes from HGTV paint because they were on sale for $1 each.
4. Sand Again (optional) and Distress
Again, to keep the smooth finish on the top, we sanded it with a very fine sand paper until it was smooth to the touch. I also distressed my table at this point. I used my sander and just went over places where the table would naturally ware more. Corners, legs, edges.
5. Polyurethane Coat.
Once the table looked the way I wanted, I painted a clear protectant coat of polyurethane on the table. I had a can of this from previous projects I had finished but I found it had little crusties and other floaties in there. This is not good for a clean white table, so we went and bought a new can of poly.
6. Poly again. And again. and again.
Since our table will have lots of use, we put TONS of poly coats to protect it from ware and tare.
It was a TON of work. Our neighbors constantly saw us in our garage and asked when we were going to finally finish it. We eventually did and we LOVE it and LOVE that we did it right and it will last for years to come.


0 comments